Thursday, October 30, 2014
Reliance selling CDMA variant of Moto G with EMI Plans Zero Down Payment
The Reliance Communications has introduced the 8 GB version of the Motorola Moto G in CDMA variant for Rs.13,490 in India, and this device is also available with EMI plans with zero down payment. Reliance is also offering optional Zero Plan for 6 or 12 months with the device as we have seen with the iPhone 5s and 5c. This offer gives unlimited local and STD calls, free national roaming, 3000 SMS per month and unlimited 3G data.

For people who want to avail this device on EMI scheme can pay only through ICICI credit cards, which includes 6 months plan where the buyer needs to pay Rs. 2334 per month and for the plan of 12 months you have to pay Rs. 1205. As the mobile is imported from international markets, Reliance is assuring one year warranty and similar to Boost or Verizon variant in U.S. it will not have any SIM slot. Every other feature of the smart phone is retained, except that it is a CDMA variant.
The Moto G has a 4.5 inch IPS LCD capacitive multi touch Lcd, with Corning Gorilla Glass 3 protection. It is powered with Quad-core 1.2 GHz Cortex-A7 processor coupled with Adreno 305 GPU and 1 GB of RAM. The device will be running on the latest Android 4.4 (KitKat) Operating System and has a 5 MP auto focus camera on the rear with LED flash and also a 1.3 MP front facing camera. The on board memory of the device is at 8 GB that cannot be extended and has the connectivity of Wi-Fi, Bluetooth, GPRS, GPS and 3G. To power the device there is a 2070 mAh battery on the back.
How to Capture Screenshot on Samsung Galaxy S5 2 Methods
We had done the explanation with the earlier flagship devices for the most simple techniques, and the same cannot be missed out for the Samsung Galaxy S5, which has more than the simple ways to get things done. For example, if you wanted to capture a Lcdshot on the Galaxy S5, there is more than one way for it, and it depends on how you wanted to do it.


For those who have earlier used any Samsung Galaxy phone, it won’t be any different for them as its the same physical keys to be used if you wanted to capture a Lcdshot on the S5 too, but if you are bored or have a situation where the pressing of buttons cannot be done, there is another way to capture the Lcdshot.
Samsung Galaxy S5 Screenshot with Physical keys: The keys you need to press here, are the power key along with the home key, both at the same time to take the Lcdshot. This would become easier when you have both the hands free because the buttons aren’t that close for a single hand to press them together.
- You just need to be ready on the particular page you wanted to capture
- Press the home and power buttons together
- You will hear the camera click sound and in a couple of seconds, there would be a message on the Lcd saying “Copied to clipboard”
- In the notification panel, there would be a message saying “Screenshot captured” with the preview of the Lcdshot, and direct options for the users to edit, delete or share the Lcdshot
This way of capturing the Lcdshot is the default one which is seen in most of the Android ICS and later devices, and the physical key combination changes based on the brand.
Samsung Galaxy S5 Screenshot with Swipe Gesture: For those who wanted something different from the physical key combination for the Lcdshot, here’s a way. This is one of the gestures which the phone has in its list, and a swipe of your palm on the Lcd would capture the Lcd for you.
To set this up, you need to go Settings > Motion > Motions and Gestures > Palm swipe to capture
Going into that section, you can toggle it on / off. You just have to swipe from one corner of the Lcd to the other, irrespective of the side. You need to make sure that the entire side (with the little finger facing the Lcd) is touching the Lcd before you swipe it.
The captured Lcdshot take a place in the File System under the Pictures folder, and in the Gallery, there is a separate folder created for the Screenshots.
These are pretty easy ways for capturing the Lcdshot on the Samsung Galaxy S5, and the physical method might be very well known to most of the users, but it does come handy to those who are shifting from some other smartphone to the Galaxy S5.
Check if your Android Phone is Heartbleed Affected Security Vulnerability Detector
calling yourself an active Internet user? you might not be one if you haven’t heard about the latest bug in the Internet security, called Heartbleed. We talked a lot about Heartbleed here, but if you aren’t sure what this is all about, do check that article to understand it better, and keep yourself safe from compromising your account data.
In short, Heartbleed is a bug in the OpenSSL security which was giving access to the hackers because there was an issue with the secret keys which get compromised and available to the hackers, and these secret keys are what would encrypt the traffic, including the names and passwords and all the personal content of the users.
The research team which found this major bug, did make a tool available for the users to check and understand whether a particular website is affected by the bug or not. But this issue isn’t limited to just the Internet, but is also seen on the devices which are using particular versions of the OpenSSL security for the authentication and security of the devices. There were some suggestions from the security firms that staying offline and not playing around with your online accounts would be a safe option for now, but you can’t stay away from your Android device for long, right? Here’s an app which would at least tell you if your phone has the security version which is affected by the Heartbleed bug.

Heartbleed Detector is an app available for the Android devices, to check if the version of OpenSSL in your device is affected by the Heartbleed bug. There is a certain behavior which if enabled, could lead to a problem to the security of the device and that too is checked by the app.
The app doesn’t do anything else than that, and it doesn’t check the individual apps for finding about the vulnerability, but you at least would get an idea whether the phone has a security version running which is at risk. And for now, there is no fix to this and if your device is running that version of OpenSSL, you need to ensure that the risky function is not turned on.
Wednesday, October 29, 2014
Speed up a portion of a videoclip in Camtasia Studio
This tutorial is about Techsmith Camtasia Studio, probably the best software to edit tutorial videos now a days. It is very user friendly and easy to use software. Camtasia Studio 8.1.2 comes out with some great features, with the help of those we can actually create tutorial videos like the professionals.
In this discussion I shall be sharing the idea of clip speed, how can we speed up a particular portion of a video or how can we slow down a portion of a video. To follow this tutorial you need to pre install Camtasia Studio, it will be better if you install the version 8.1.2. Secondly you need a video to edit. So without pulling more this discussion, I am going to write the necessary steps with some screenshots, which will help you to understand better.
Follow the following steps
1) Run the Camtasia Studio, after installation.
2) Now click on Import media to insert the video
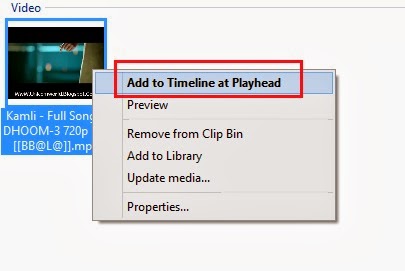
3) Now Right Click on the Video and click on Add to Timeline at Playhead
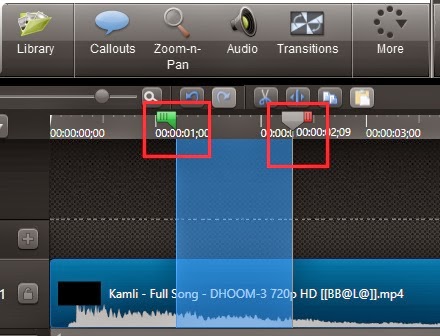
 4) Now select the portion of the video, which is to be speed up. (Take the help of the following screenshot)
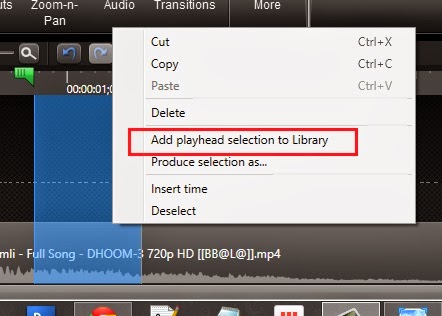
5) Now Right click on that portion and click on Add playhead section to Library as shown in the screenshot
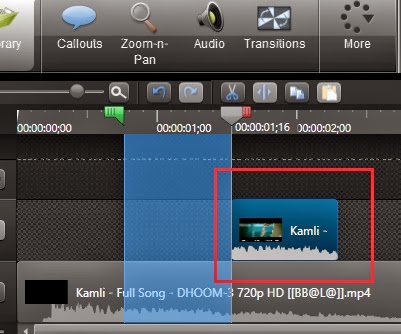
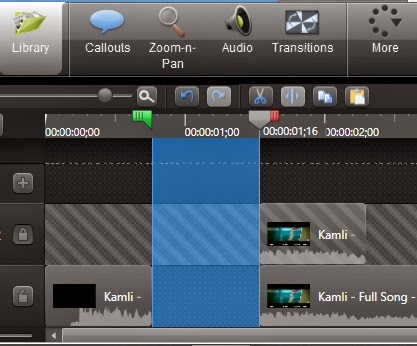
 6) From the Library add the clip to the timeline, after adding the clip the timeline will be like
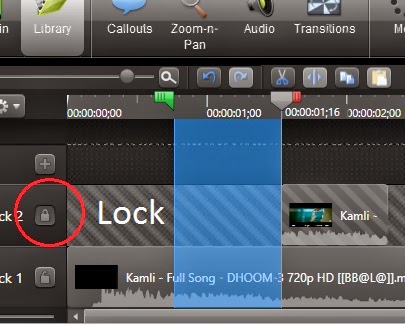
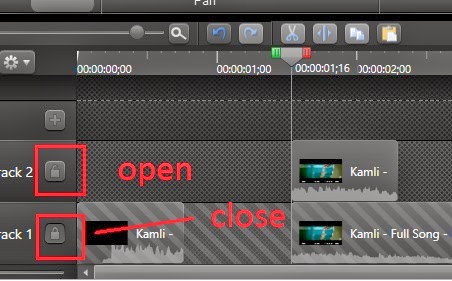
 7) After that lock the recently added clip by clicking the open lock as shown in the following screenshot
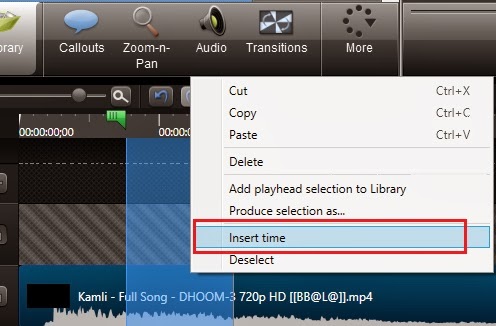
 8) Now Right Click on the selected (blue coloured) video portion and click on Insert time, as shown in the screenshot
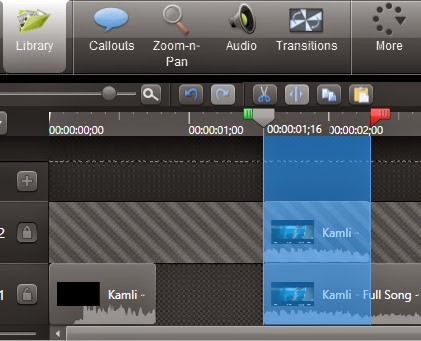
9) Now you will get a timeline as shown in the following screenshotIn this discussion I shall be sharing the idea of clip speed, how can we speed up a particular portion of a video or how can we slow down a portion of a video. To follow this tutorial you need to pre install Camtasia Studio, it will be better if you install the version 8.1.2. Secondly you need a video to edit. So without pulling more this discussion, I am going to write the necessary steps with some screenshots, which will help you to understand better.
Follow the following steps
1) Run the Camtasia Studio, after installation.
2) Now click on Import media to insert the video
3) Now Right Click on the Video and click on Add to Timeline at Playhead
5) Now Right click on that portion and click on Add playhead section to Library as shown in the screenshot
11) Now Right Click on that selected portion and click on Cut


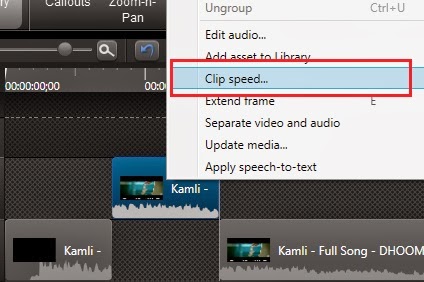
14) Now Right Click on the Clip and click on Clip speed, set the value, by default it is 100, if you want to speed up the clip increase the value and vice versa.
15) Finally select both the clips by pressing the Ctrl Key on the keyboard, and make them a Group. At last produce the video.
Carefully follow the above steps, if you get any problem, you can contact us. Thanks
Tuesday, October 28, 2014
How to send a SMS without showing mobile number
Have you ever cheated someone by messaging. I think you wanted to be but worried about knowing your number, isnt it. But it is over and you can say bye bye to those kind of worried situation, because foosms.com has brought out a online messaging application, which
does not let the receiver know your mobile number, instead of that they send their company tag. Isnt it pretty cool. But it cant send messages to DND (do not disturb) number. However one can deactive DND service by calling to the service provider.
Though I am writing about this, this is my kind request to you that do not use this in illegal purposes. You can use it just for having fun with friends.
Follow the following steps
1) Go to foosms.com
2) Now you will have a SMS field like this

3) Type the phone number, your message (within 140 character)
4) Click on Send SMS
Thats all about sending a message without showing your mobile number. I again request you that dont be cheap by using it illegally. Hope you enjoyed.
2) Now you will have a SMS field like this
3) Type the phone number, your message (within 140 character)
4) Click on Send SMS
Thats all about sending a message without showing your mobile number. I again request you that dont be cheap by using it illegally. Hope you enjoyed.
How to customize Subscribe to Posts Atom link
Blogging is not all about writing posts, you should always concern about how much traffic you are getting. Though it is the first thing to write our post in decent manner so that user get it interesting, we should always have a good template with user friendly interface. A post
along with a professional design gets more traffic than a post with a odd look. As a example when you shift blog post title to center, the Subscribe to: Posts (Atom) lying on the startside bottom of your blog post seems very odd, which gives a rough look to your blog. By doing some simple customization we can add a background to Subscribe to: Post(Atom) link and can push it to center and can also add a border to it.
along with a professional design gets more traffic than a post with a odd look. As a example when you shift blog post title to center, the Subscribe to: Posts (Atom) lying on the startside bottom of your blog post seems very odd, which gives a rough look to your blog. By doing some simple customization we can add a background to Subscribe to: Post(Atom) link and can push it to center and can also add a border to it.
Follow the following steps carefully
1) Go to Blogger--------Design-------Edit HTML2) Back up your Template
3) Press Ctrl+F and search for the code.
.feed-links{clear:both;line-height:2.5em}
4) Replace it by the following codes
.feed-links{background:#ffffff;border: 1px solid #9e9e9e;
text-align:center;clear:both;line-height:2.5em}
If you want to add a rounded border add the following codes after border-radius: 5px;in the above codes.
Finally the codes for the feed link with background color and rounded border will look like this
5) Now click on Save.feed-links{background:#ffffff;border: 1px solid #9e9e9e;
border-radius:10px;
-moz-border-radius:10px;
-webkit-border-radius:10px;text-align:center;clear:both;line-height:2.5em}
- If you are getting any problem in implementing this codes,contact me
Monday, October 27, 2014
Remove Unwanted Part of a Video Best Free Video Editing Software
Besides, discovering a freemium video editing software is almost hard. Lets see why do we need a video editor,how to get it for free and procedure to cut video section.
Need for Video Editor/Cutter
- Nowadays, most of the movies are having adult scenes which is not pleasant to watch it with our entire family. According to the taste of film directors, they add such scenes for logical relevance to the matter at hand. Though the reason is seems to be acceptable, but definitely it is not safe to watch those movies with family. In such case there is a need for video cutter.
- Assume that you are a video shooter and want to edit the video parts, there is need for video editor. With the help of video editor, we can give additional effects to the video which makes it enjoyable to watch.
There are some video converting software programs which can also act as a video editing program. By default, Windows PC comes with Movie Maker. Windows Movie Maker allows you to remove video parts easily. Simply, open the application and add the video file to start further operations.
The only disadvantage of Movie Maker is that it supports WMV, AVI, ASF formats. Suppose if you are having various video file formats such as MP4, MPEG, you need to convert these formats to make it readable by Movie Maker. It has been well known that altering the format of a file reduces its entire quality.
Freemake Video Converter
Freemake Video Converter is a freeware video editing application. This software can be used to convert between video formats, rip video DVDs and create music visualizations. Freemake Video Converter 2.0 was a major update which integrated two new functions which includes ripping video from online portals and Blu-ray Disc creation and burning.

How do I Trim a Video in Freemake?
- Download Freemake free video converter and install it on your PC.
- Launch the app and click on + Video.
- Open your video and click on dedicated Cut button.
- Play video.
- After that, cut any number of selections whatever you want.
- Finally click ok to save the selection on your computer.

Using Freemake Video Converter tool is very easy and much better than Movie Maker.
Features of Freemake
- It supports several formats like AVI, MP4, MPEG, WMV, 3GP, DVD, HD, MKV, MP3, WMA, FLAC.
- Upload videos directly to YouTube.
- It can burn compatible video streams to DVD/Blu-ray discs.
Modifying your Auto Sound System
If you are one of the many people around the world who happens to be into cars and the new pastime called modding Im sure you have considered the implications of modding your auto sound system. For many the idea of modifying an automobile is very exciting. Its a way to take the standard canvas purchased from the dealer and turn it into a work of art that you drive to work and play each and every day. The same theory holds for your sound system as well. You can take the basic pieces and parts and turn them into something so much more than they were to begin with.
If that isnt enough you can purchase all kinds of LED lights and other nifty gadgets that glow and go along with your car while dancing to the beat. If you want to make a splash driving down any boulevard, this is definitely one way to not only be seen but also leave a lasting impression. Your creative genius with your auto sound system will cause quite a stir and give plenty of people much to discuss the next morning and plenty of people a great deal of inspiration to try to mimic or at the very least incorporate into their units somehow.
There are all kinds of sound systems for automobiles. Many of these systems are sold as part of a package and readily available to multiple consumers. You have the option as a creative modding genius, to take the plane Jane package and turn it into something so much better than it is or to even go off on a tangent and invent a total package of your own by mixing and matching pieces and parts from several different packages or pieces of packages.
It doesnt matter where your creativity ends and begins there is never a challenge too great for a true modder at heart. From cars, trucks, boats, and computers to car stereos there is no task too demanding or too complicated for a true modding mind to tackle and transform. Perhaps its the blinking lights or all the wonderful possibilities that abound but auto sound system mods are among my favorite to see in action. Its amazing the things that can be thought up by a wicked imagination and accomplished with a little time and a lot of effort.
Seriously though, if you are going to go to all the trouble of dressing up your vehicle shouldnt you also take the time to dress up your auto sound system? There are all kinds of gadgets and gizmos you can buy that will work with the music your speakers are pumping in order to create a fabulous overall affect of music and light that is sure to get some great reactions from those you cruise on by. These are perfect accessories for summer time beach driving if you know what I mean. Growing up on the coast, I found a great section of people who were constantly modifying their cars and sound systems. I think it is incredibly amazing what can be done with metal, glass, color, light, and sound and really enjoy seeing all of the amazing creations that are made.
Even if you havent really given much thought to modifying your auto sound system before, I hope that you will consider it now if you are a serious modder. I honestly believe you might amaze yourself at some of the fabulous tricks of sound and light that you can come up with when properly challenged and inspired.
Take the time to check out the interesting things that have been done, and then formulate a hypothesis on what can be done. It is truly amazing the wonderful things that have been created as the result of a glove being thrown so to speak. Jump in and create a fabulously modified sound system that will be the absolute envy of everyone you pass along the way.
Sunday, October 26, 2014
Watch Recently Released Official Trailers of New Movies Coming Out on YouTube

Generally we browse the giant YouTube for watching funny videos, songs, movies, magic shows, how to guides, educational videos and much more. Additionally, we are curious to know the expected upcoming movies info in detail. Indeed, we surf YouTube to watch official trailers of new movies coming out.
When you search YouTube for officially released trailers of movies, you may find it hard to get the official version videos. It is because videos on YouTube are ranked according to the users searched keyword.
Another reason is that so many users uploads videos and they frame irrelevant keywords to their videos to get more exposure. This type of black hat technique creates confusion among normal video surfers. Unfortunately, they ends up in subscribing to unofficial video channels.
Watch Official Trailers of Movies

If you want to watch official movie trailers as soon as it appears on YouTube, you may need to subscribe to hundreds of video channels which looks not so cool.
To give a solution to this, YouTube is having a devoted channel which simplifies the concept of searching for officially released movie trailers. Especially official trailers of Hollywood movies are available on this page. When an official version of film trailers released on YouTube channels, shortly this page would get updated which makes available to watch those videos.
This channel is hosted by VISO Trailers which is the biggest trailer channel of YouTube. Just subscribe to this channel to watch new trailers of upcoming movies. Users can also watch HD trailers on this channel.

Kenwood Car Stereo Car Audio
Kenwood Car Stereo Lets You Listen To The Future Of Car Audio. - This brand is a household name for every car audio enthusiast. Mention the name Kenwood car stereo and they will know what you’re talking about.


Read here..

Kenwood car stereos have produced high quality consumer electronics, test equipment and communication equipment since 1946. Kenwood car stereos primarily specialize in the design, engineering and manufacture of wireless communication infrastructure but are also renowned in the production consumer mobile and home entertainment systems. Kenwood car stereos are also committed to creating the finest quality components with state of the art technologies that has earned them a huge following in the audio products scene.
At present, Kenwood car stereos have a very impressive product lineup that would make anyone drool over, whether he is an audio enthusiast or not. For the regular Joe who isn’t really into technical stuff, and is just looking for something nice to put into his ride, Kenwood car stereos offer sleek designs that will surely satisfy anyone’s craving for aesthetic. Tech-freaks and geeks will also be impressed with the specs a Kenwood car stereo has.

A lot of Kenwood car stereo units nowadays include popup LCD panels for watching VCD/DVD movies. The Kenwood KVT-717DVD 7.0” Wide, Fully Motorized In-dash Monitor DVD/WMA/MP3 Receiver is a good candidate for any situation.
• 7.0 inch Wide Color TFT Active Matrix Display
• Full-automatic Open/Close with slide and angle adjustments
• Interactive Touchscreen Control with OSD
• Audio Easy Control Mode while Playing Visual Source
• Selectable Wall Paper (6 Patterns)
• Installer/Backup Memory of Audio/Video Setup
• Maximum Output Power : 50W x 4 (MOSFET Power IC)
• 3 Preouts with 5V Pre-out Level
• 2 RCA AV Inputs / 1 RCA AV Output
• Video Input for Rear View Camera
• RGB Input for Navigation System
• System Q/ System Es+
• DVD Menu Direct Touch screen Control
• MPEG 1/2 Video files (.mpg) and JPEG files (.jpg) Playback
• Dual Zone Source & Volume Control
• DVD±R/RW Compatible
• External Media Control — iPod Ready
• Optional TV Tuner
For those who might not get what the hell all of these means, just imagine this: a really thin monitor panel that smoothly retracts and extends at the push of a remote, crystal clear movie and picture playback, all encased in a beautiful black matte finish polymer casing done with a space age design.
If all you want is a just a regular car stereo for playing CDs’, listening to mp3s or the radio, Kenwood car stereo have a lot to choose from. A good head unit would be the KDC-MP928 AAC/WMA/MP3/ CD Receiver with External Media Control.
• Auto-Slide Detachable Faceplate
• Rotary Encoder & Jog Control Knob for Easy Operation
• 4096 Color OEL Display
• Display Customize Function
• Maximum Output Power : 50W x 4 (MOSFET Power IC)
• ACDrive (Advanced Codec Drive)
• AAC/WMA/MP3 Playback
• G-Analyzer (Graphic Motion Analyzer)
• Built-in DSP : DTA/System Q(4band P-EQ)/Digital Es/SRS
WOW Digital Effect
• O.D.D. (Offset Dual Differential) D/A System for Sound Quality
• Installer/User/Backup Memory of Audio Setup
• SIRIUS Satellite Radio Ready
• HD Radio Ready
• External Media Control — iPod Ready
• Dual Zone Source & Volume Control
• AUX Input
• Gold Plated 3 Preouts with 5V Pre-output Level
The Kenwood car stereo auto slide detachable faceplate allows you to take the faceplate (one which has all the buttons) in order to prevent theft by taking away the functionality of the unit left in the car.
3 Ways to Sign into Multiple Accounts Simultaneously
To overcome this, we need to try some simple tricks to open more than one account. There are actually 3 more ways to sign into multiple accounts.
Sign into Multiple Accounts Using Different Browsers
Just a E-Mail ID is not only termed as an account. It may be of Facebook, Twitter, Google accounts or whatever. Browsing through different accounts using different browsers is the simple way to switching into various IDs. For example: if you want to manage multiple Twitter accounts, using more than one browser is the best choice.

So during critical situation, i.e., if your web browser became unresponsive, then switch to another browser. Hence, its better to install 2-3 web browsers on your computer.
Log into Multiple Google Accounts in the Same Browser
For E-Mail service, most of the people prefer Gmail, a Googles product. The reason behind is not just one. I can tell that Gmail is popular for its Anti-Spam feature and large data storage. If you are a Gmail user, you dont even need to switch to another browser to log into other account.

If you have logged into your Gmail ID and then want to log into another account, you need to click on your profile photo (while hover the mouse cursor on your profile photo, it will show your full name and Gmail ID) which is at top right side in your account. Click on Add account. Thats it. A new tab will get open for you to sign into another account. When you click on sign out while using multiple sign in, then you will be signed out of all your accounts at the same time.
Anonymous Browsing Mode
Privacy mode which is also knows as Ghost mode is a feature supported by some web browsers. In Google Chrome, it is called as Incognito browsing mode. It allows you to browse the web without storing your foot print. i.e., the browser wont store your browsing history, cache and cookies. So, take advantage of this feature in order to sign into multiple accounts on websites.

The short-cut key for enabling the privacy or incognito mode in your browser is given below:
- For Chrome: Ctrl+Shift+N
- For Opera: Ctrl+Shift+N
- For FireFox: Ctrl+Shift+P
- For Internet Explorer: Ctrl+Shift+P
Auto Tweet Post From Facebook To Twitter Know How To Link Facebook To Twitter
Instead of dual sign in process, you can opt to link Facebook to Twitter.
Advantages Of Linking Facebook To Twitter
- This method saves your time and so you can do some other work.
- It is very useful for one who post and shares much.
- Sharing once on Facebook will automatically ping it to Twitter instantly.
- You wont miss your Twitter followers.
- You can connect both your Facebook profile and pages to Twitter.

Link Facebook To Twitter
- Log in to your both Twitter and Facebook account and go to this link https://www.facebook.com/twitter/
- If you are already on your Facebook home page, then add "/twitter/" next to facebook.com without any quotation marks.

- Click on Link My Profile to Twitter or Link a Page to Twitter.
- This will take you to another page as shown below.

- Link your profile or pages to Twitter as per your wish by clicking on Link to Twitter.
- Then it will take you to Twitter website in order to authorize.

- Click Authorize app.
- Within few seconds, it will redirect you back to Facebook.

- Thats all, now we have connected it successfully.
- You can also edit the settings. So that it is easy to control which one do you want to share to Twitter such as photos, status updates, video, links, notes and events.

- Click on Save Changes.
Also there is an option to unlink Facebook from Twitter. Alternatively, you can also unlink Facebook directly on the Twitter website. Lets see how to do it.
- On your Twitter home page, go to Settings > Apps > Revoke access
Saturday, October 25, 2014
Download Call Logs Backup Restore App For Android devices

Simply you should to create a special folder where call log backup will be stored.
The backup is stored by default in /sdcard/CallLogBackupRestore folder.
This application helps if you need to keep a history of your all the calls (made from or received on your device). The Android system operation have possibility to keep a history of the 500 latest calls and any another call older is automatically deleted when the call overcome this limit.
Call Logs Backup & Restore has support for up 500 calls and with this app you can easily restore all the call log on your phone.
Another great function for this small application it is the possibility when you made an update for your phone, rooted or flashed the firmware of your device and lost all call logs, ‘Call Logs Backup & Restore’ is able to backup and restore your call logs. It is very easy to download it and install it on your smartphone, only go and click here to download Call Logs Backup & Restore from Google play market store.
The application comes with great features:
- The format for Backup Call Logs / History is in XML format.
- You can choose a scheduled time to automatically backup every day if you want to have an auto save job.
- Like as say before, you can choose the name of the file to make the backup.
- You can easily to open with a browser the XML file for viewing easily the content.
- We have the option to adding the date in readable format.
- Another great option it is to use an “Archive Mode” where the backup data keeps getting added to a single file.
- The Backup format is independent of the Android version, so you can easily to move your call logs from an old Android version to a new one, or invers.
- We have the option to select the backup file to be restored from the folder.
- We can easily view Backup Contents from within the App.
- With this application we can delete all Call Logs on the Phone.
- The application has possibility to Email us a backup file.
- A specific Option it is to delete old files automatically after specified number of days.
Backup: with this button we can to back-up all the Call logs on the phone to the xml file.
Restore: with this button we can read the xml file and creates a new Call log for every entry found in the file. The Duplicates are checked based on number, duration and date/time of the call.
View: with this button we can view the contents of the backup file.
Delete Backups: This button allows us to make a selection of backup files to be deleted.
Delete Calls: This button helps us to deletes all the Call logs on the phone, so that a Restore can be performed.
Donate: with this button if you wish to donate for the App via PayPal access this button.
In Menu Option we find:
Help: – with the help information about the ‘Call Logs Backup & Restore’ App.
Preferences: with this option we can open the Preferences Screen.
Send by Email: this option allows you to send the backup file by a custom email.
How to add social share buttons with Hover effect

Method follows as:
1) In New Blogger interface
Dashboard-----Layout-----Add a Gadget-----Choose the HTML/JavaScript Gadget
In Old Blogger interface
Dashboard----Design----Page elements----Add a Gadget----Choose a HTML/JavaScript Gadget
2) Now add the following codes
.pbtv2Social {
display: block;
margin: 2em auto;
width: 200px;
height:40px;
}
.pbtv2Social span {
float: left;
display: inline;
margin-right: 8px;
}
.pbtv2Social span a {
display: block;
width: 32px;
height: 32px;
text-indent: -9999px;
background-color:none;
background: transparent url("https://blogger.googleusercontent.com/img/b/R29vZ2xl/AVvXsEjR5-PDK1llD0dKdpOBmQ_UhDY1wJyqEuuKCDVxA6XM5okBKc96FM56aoWUBXwHPdhbG6VOX_ESGphzJ6mcnNb6brlY70Ea0THcwIybv6umq2JWJH7NbnWVWFGEdkj5_hm4WS9bEw9VWxiW/s1600/social+icon.png") 0 0 no-repeat;
}
#iconTwitter {background-position: -33px -33px;}
#iconFacebook {background-position: -66px -33px;}
#iconRSS {background-position: 0 -33px;}
#iconYouTube {background-position: -99px -33px;}
#iconGooglePlus {background-position: -132px -33px;}
#iconTwitter:hover {background-position: -33px 0;}
#iconFacebook:hover{background-position:-66px 0}
#iconRSS:hover{background-position:0 0}
#iconYouTube:hover{background-position:-99px 0}
#iconGooglePlus:hover{background-position:-132px 0}
https://twitter.com/TechnoTrickoloo id=iconTwitter target=_blank title=Follow us on Twitter>Twitter
http://www.facebook.com/pages/TechnoTrickology/135531163253082 id=iconFacebook target=_blank title=Join us at Facebook>Facebook
http://feeds.feedburner.com/blogspot/ZFqps id=iconRSS target=_blank title=Subscribe our RSS Feed>RSS
http://www.youtube.com/channel/UCdmqJ87bCAxR4kPsgrulF3A?feature=mhee id=iconYouTube target=_blank title=Follow our YouTube Channel>YouTube
https://plus.google.com/u/0/103848333741261169063id=iconGooglePlus rel="author" target=_blank title=Follow us at Google+>Google
Change the highlighted URLs with your account URLs
3) Click on Save in old blogger interface and in case of New Blogger interface click on Save arrangement
How To Deactivate Facebook Code Generator
Just follow the simple steps to cancel the Facebook code generator.

Disable Facebook Code Generator via PC
- Log into your Facebook account.
- Go to Settings > Security > Code Generator.
- Then click on Edit > Disable Code Generator.

- Then just tap on Remove Code Generator.

Now, check whether you have successfully bypassed the Facebook security log in approval. If its not seems to be working, it is surely a major bug. But again feel free, as there is no need to worry at all. Because there is another step you should do to deactivate the FB code generator.
Remove Your Phone Number From Facebook
- Go to Settings > Mobile.

- Then click on Remove to completely remove your phone number from Facebook account.
- Now, all you have done!
Add a new phone number suppose if you want to secure your Facebook account.
To Sum Up
For me too, when I disabled the code generator, I thought that finally I have deactivated the security feature but it went in vain. It again and again asked me to enter the security code. After that I have removed the phone number from Facebook to get rid of this bug.
Wednesday, October 22, 2014
Sprint preparing to launch HD Voice Before Year’s End
Sprint has indicated that it’s preparing to launch HD Voice service. Till the end of this year, the requirements for HTC Evo 4 G LTE are that the equipments must support voice HT and local network where the equipment’s owners connects to be upgraded and modernized with Vision Network. HD voice improves a lot the experience of talking on mobile phones. Sprint afirmed it will be released in limited edition this year and it will rise well before the end of 2013. The company says it is needed an upgrade to a critical mass of phones, plus improvements required at the network that can support HD Voice. Besides, Sprint needs to take different equipment than Evo HTC 4G LTE phone market. They explains that HD Voice technology will increase at the end of 2013 and in 2014, where significant growth is expected at the network and mobile phone that supports HD Voice by the end of 2014.
source: phonescoop
Quora App for Android Official in Google Play

Some features of this very useful application for Android:
- Find a quick, has voice-enabled search.
- You can add Quora like integrate search for your phone .
- You are always aware of your notifications and changes.
- You can install a widget to see in feed best Quora answers right now.
- You can share with your friends the interested content of Quora in any social networks used by you.
Saturday, October 18, 2014
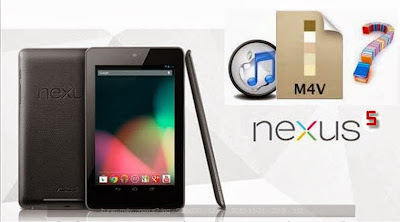
Play itunes M4V movies on Google Nexue 5
If you have a Nexus 5 and want to play iTunes M4V movies on it, its absolutely impossible. Movies purchased from App Store are usually in M4V format with DRM-protected, can only play on Apple products like iPhone, iPad, iPod, Apple TV, if you’d like to watch the movies on non-Apple players like Google Nexus 5, you must remove the DRM from M4V and use a 3rd-party tool to convert M4V files to Nexus 5 compatible format at first.
With Best DRM removal tool – Pavtube ChewTune you could easily convert and transfer iTunes M4V videos to google nexus 5 support video. (For Mac users: ChewTune for Mac)
Guide: How to convert iTunes M4V video to Google Nexus 5?
Free download Pavtube chewtune
Step1: Add files
Launch ChewTune and then click add button at the main interface, choose the M4V movies.
Step2: select output format
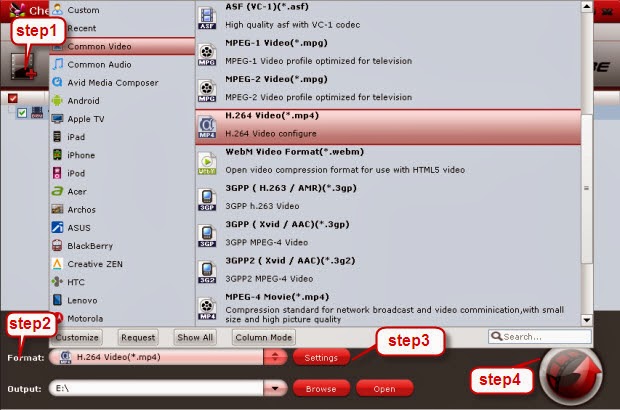
To make iTunes M4V movies be played on Nexus 5, you need convert DRM M4V to Nexus 5 compatible video formats like MP4, MOV and AVI with H.264 or MPEG-4 video codec. Just click the format menu and then choose common video>H.264 video (*.mp4)”. Don’t forget to set the output folder.
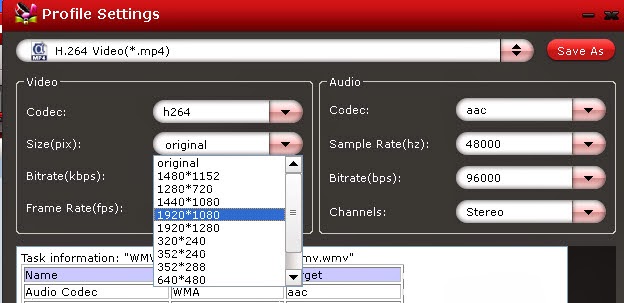
Step3: If you want to set video and audio parameters like video codec, bit rate, size, frame rate, etc, click the setting button you will see the profile settings, so you could customize the output video and audio quality in your own way.
Step4: Start conversion.
Click "Convert" button to begin the conversion. There will be a pop-up window showing you the process of the conversion. You just need to wait for a moment.Once it completes, open output folder, locate the MP4 file and transfer the iTunes M4V movies to Google Nexus 5 for viewing, just use the USB cable that you can have your M4V-format video play on your Nexus 5.
With Best DRM removal tool – Pavtube ChewTune you could easily convert and transfer iTunes M4V videos to google nexus 5 support video. (For Mac users: ChewTune for Mac)
Guide: How to convert iTunes M4V video to Google Nexus 5?
Free download Pavtube chewtune
Step1: Add files
Launch ChewTune and then click add button at the main interface, choose the M4V movies.
Step2: select output format
To make iTunes M4V movies be played on Nexus 5, you need convert DRM M4V to Nexus 5 compatible video formats like MP4, MOV and AVI with H.264 or MPEG-4 video codec. Just click the format menu and then choose common video>H.264 video (*.mp4)”. Don’t forget to set the output folder.
Step3: If you want to set video and audio parameters like video codec, bit rate, size, frame rate, etc, click the setting button you will see the profile settings, so you could customize the output video and audio quality in your own way.
Step4: Start conversion.
Click "Convert" button to begin the conversion. There will be a pop-up window showing you the process of the conversion. You just need to wait for a moment.Once it completes, open output folder, locate the MP4 file and transfer the iTunes M4V movies to Google Nexus 5 for viewing, just use the USB cable that you can have your M4V-format video play on your Nexus 5.
Subscribe to:
Comments (Atom)