Showing posts with label Speed. Show all posts
Showing posts with label Speed. Show all posts
Saturday, November 15, 2014
10 Easy Steps to Speed Up Your Computer Without Upgrading
It seems that the longer you own your computer, the slower it gets! A lot of people will keep their computer until it gets so slow that they feel they need a newer, faster model. Some feel like the reason it is getting slower is because it is getting older, when that is just not the case. Your computer should run just as fast as the day you brought it home – if you follow these 10 Easy Steps to Speed Up Your Computer.
1). Empty the Temp directory regularly:
Every time you launch a program, it creates a temporary file, until you either save or close the file. The reason it does this is in case your system crashes or gets turned off (before saving the file), it will be possible to recover the unsaved file you were working on. This is a good idea, but rarely works. Every time your system crashes, locks up, or gets turned off while you have open files, these temp files get created and just sit there in the Temp directory. Then, every time you launch a program, it looks through all of the temp files (to see if one needs to be recovered) and slows the open process, and in some rare cases, even locks up when trying to launch. In any event, the launch process is slowed.
Other ways of getting unneeded temp files is by installing programs. Most programs that get installed extract temp files (needed during the installation) to the temp directory, but a lot of times don’t get deleted when the installation is complete.
Windows also uses the temp directory for its temp files, for recovery purposes and ongoing use.
After a short while, the temp directory fills up with hundreds (and I have even seen thousands) of temp files that always get scanned over when Windows starts up and when programs launch. This slows everything down immensely.Rule of thumb for Temp Files: If you don’t have any programs open (and nothing minimized in the bar below), then you shouldn’t have ANY temp files in your temp directory. If you do, delete them.To delete Temp files, make sure NO programs are open, and…a. In Windows 95, 98 or Me, go to C:WindowsTemp and delete everything inside the Temp folder.b. In Windows 2000 or XP, it is a little trickier. First, make sure that you can see hidden folders. Double-click My Computer. Click on the Tools pull-down menu, and then on Folder Options. Click on the View tab. Scroll down and click on Show Hidden Files and Folders. Click Ok. Now you can go to theC:Documents and SettingsAdministratorLocal SettingsTemp folder. Delete everything here.
Also, look in the
C:Windows(or Winnt)Temp or Tmp folders. Delete everything here, as well.Note: this assumes that your logon ID is Administrator. If the main account is not Administrator, or if there are more than one account, substitute “Administrator” for the account names, and delete the temp files from all of the C:Documents and Settings(account name)Local SettingsTemp folders.
2). Empty the Temporary Internet Files regularly:
This is similar to the Temp directory, but for images and cookies while browsing websites. Every time you go to a website, your browser will look through your list of temporary Internet files, to see if you have all of the images needed to view your requested web page. If it is a very long list, it will delay your view time. However, if you have a dial-up, this is the lesser of two evils. If you already have the needed images, it is quicker (for a dial-up) to look through your temporary Internet files, than to download new images every time you visit a website.
On the other hand, if you have a broadband Internet connection (highspeed CableModem, DSL, Wireless, etc.), and you want a little more snap in your surfing, then you should delete your Temporary Internet Files on a regular basis, and choose to Check for Newer Images on Every Visit to a web page.To empty Temporary Internet Files:
Go to your Control Panel, by click on the StartSettingsControl Panel (or in Windows XP, just StartControl Panel) and double-click the Internet Options icon. Choose to Delete Cookies, and to Delete Files. This will clear all of your Temporary Internet Files.
To have Internet Explorer always check for new images and content on every visit to a web page, to the right of the Delete Files button, is the Settings button. Click this button and choose Every Visit to the Web Page. This option never has Internet Explorer look through your Temporary Internet Files to see if you already have the images needed. This way, Internet Explorer will just automatically download every image, every time, without looking through a list. If you have a good Internet connection, this is the better way to go. Don’t forget to delete your Temporary Internet Files every once in a while (see above).
3). Check your hard disks for problems: There are two different types of disk checks: one is a file check, which checks the state of your operating system, checks all of your files, your file structure, and other software checks. If there are software problems (such as a corrupt FAT (file allocation table), etc., this check will attempt to fix it. The other is a physical hardware disk check. This checks the surface of your hard disks, to see if there are bad sectors (sections) of your hard drive, to see if your drive is physically experiencing problems. This disk check will attempt to repair the bad sectors, but if it can’t, it will mark the sector as bad and attempt to move the file(s) or file “pieces” to a good sector(s) of the disk. By marking the sector as bad, it knows not to write any future files to this section of the hard drive.To run a disk check (or scan disk), here are the steps:a. For Windows 95, 98, or Me, double-click My Computer. Right-click the C-drive and click on Properties. Click on the Tools tab and choose to check the computer for problems. If you choose to do a Thorough Scan, this will do the hardware check for physical disk damage or sector damage. Otherwise, the Standard Scan does the software file check. In either case, you can choose to have the scan automatically fix any errors it finds. The Thorough Scan does take quite a bit longer. You may want to let this run over night. Only do the Thorough Scan when you think there may be a problem with your drive itself, or if you haven’t run it in a few months, otherwise, run the Standard Scan once a week or so.b. For Windows 2000 and XP, double-click My Computer. Right-click the C-drive and click Properties. Click on the Tools tab and choose to check the computer for problems. Click on Check Now. You will then have two check boxes. The top option is for the file check, and the second option is for the hardware (physical disk) check. Check either one, or both. At least check the top one. Again, if you think you may be having problems with the hard disk itself, then check the second one, as well. And just like the Windows 98 Thorough Scan, this will take quite a bit longer to run, so let it run over night. One thing, though: For Windows 2000 and XP, you won’t be able to run the check right then. After clicking the Start button (once the check boxes are checked), you will need to reboot to run the disk check. It will ask you if you want the system to run the CHKDSK on reboot. Choose Yes and reboot. Just before getting back into Windows, the system will do its CHKDSK, and depending on which options you chose, will take either a few minutes, and sometimes up to an hour or so, to run. Let it run.
4). An even more thorough disk check (and tune-up): It would be to use a 3rd party utility (a stand-alone program outside of Windows) to check everything for you, automatically. One of my favorites is TuneUp Utilities 2004. It costs $39.99, but they do offer a FREE download trial of 15 days, to check it out to see if it speeds up your computer and/or fixes any problems. This program does a really good job of not only checking your computer’s file structure, master boot record, file allocation table, and files, but also an extremely good job of detecting and fixing bad sectors of your physical disk drives. And not only that, it also tunes up your system for increased speed, checks and cleans your registry, adjusts memory for you, tweaks your Internet settings for faster downloads and browsing (whether you use a dial-up or broadband), and streamlines your operating system for peak performance.
5). Dont want the TuneUp Utilities: If you don’t want to get the TuneUp Utilities 2004, you can do a few of the performance tweaks yourself, if you have Windows XP. By default, EVERYTHING is turned on in Windows XP. It isn’t very streamlined for performance, but rather for appearance. You can turn off a few of the unnecessary features, and Windows will still work just fine, and maybe a little faster.
To do this, right-click on My Computer and click on Properties. Click on the Advanced tab. Under the Performance section, click on the Settings button. On the Visual Effects tab, you will see a list of check boxes. By default, these are all on. You really don’t need any of them. If you choose one of the radio buttons at the top, say, Adjust for Best Performance, then all of the check boxes will turn off. This will noticeably speed up your computer. You can go through the check boxes one by one, and determine which ones you can and can’t live without. The one that will make the biggest effect is the very last one in the list. This is the Themes. If you turn it off, it will free up a lot of system resources and give you quite a bit more memory to work with, but Windows XP will look more like Windows 2000. For most people, this isn’t a problem. It is all eye-candy, anyway. Your pretty green pasture picture will disappear; your pretty green and blue buttons and task bar will go to a gray. If you can live with these things, then you will have much more performance. You will find that menus open up much more quickly and everything responds more immediately.
6). Turn off Active Desktop: Active Desktop turns your desktop into a web page, and allows you to have things like a real-time calendar, and up-to-the-minute weather or stocks. These things are really neat, but your system takes a performance hit when they are running in the background all the time. And even if you don’t use Active Desktop for anything, just having it active can cause a performance decrease. Turn it off.a. In Windows 95, 98 and Me, right-click on the desktop and in the pop-up menu, choose Active Desktop. Inside that option, uncheck Active Desktop. If there is no check next to it, then it isn’t on. Don’t choose it. Instead, just click the desktop again to get out of the menu.b. In Windows 2000, right-click on the desktop and in the pop-up menu, choose Active Desktop. Inside that option, uncheck Show Web Content. Again, if there is no check next to it, then it is not on. Do not check it.c. In Windows XP, right-click on the desktop and in the pop-up menu, choose Properties. On the Desktop tab, choose Customize Desktop. Now, on the Web tab, make sure that there are no websites chosen here. If there aren’t any, then Active Desktop is not on. Cancel and go back to the desktop.
7). Install and run a good AntiVirus program: Install and run a good AntiVirus program to keep out viruses and Trojan horses that can take over your system. If you have a virus(s), your system performance can be dramatically decreased. Viruses can do all kinds of nasty things to your computer. They can take over your computer, erase your hard drive, use your computer as a server, give you a bunch of illegal music or programs and tell all of their friends to download it all from you – leaving you holding the bag and supplying the computer space and bandwidth for their hobby. So, protect yourself with a good AntiVirus program. One of my favorites is AVG. It is not only a really good AntiVirus program, but it is also FREE! If you don’t have any AntiVirus software on your computer, get AVG AntiVirus NOW by downloading HERE. If you already have an AntiVirus program, and you want to use AVG instead, do NOT install AVG. First, uninstall your current AntiVirus program, reboot and install AVG. You do NOT want to have two AntiVirus programs installed at the same time. They will work against each other and can cause problems.
8). Get rid of Spyware: A lot of computer users have Spyware and don’t even know they have it, much less how to get rid of it. If your computer has been taking you to websites that you don’t want to go to, or if you get pop-ups when you aren’t even on the Internet, or if your computer has been running extremely slowly lately, for no reason, you probably have Spyware.
On all of the computers that I setup, I install two different AntiSpyware programs: AdAware SE and SpyBot. These two programs are highly recommended by TechTV (G4) and other computer authorities (including my own research on Spyware) and work very well together. They compliment each other and catch Spyware that the other misses, but together, do a very good job.
SpyBot is not only a good program for getting rid of Spyware, but also as a preventative Spyware-catcher. It sits there and looks for known Spyware coming into your system, as well as suspicious-looking content. If you use the Tea-Timer feature, it can be a little annoying, but ANY suspicious-looking program, trying to be installed on your system, is flagged and your permission is asked for it to be installed (now and always). AdAware SE has a little better Spyware database in it, but is not setup as a preventative AntiSpyware program. It does do a good job when you keep up on the updates and manually scan your system with AdAware.
If, after downloading and installing, updating, and running both of these AntiSpyware program, you still can’t get rid of your Spyware, you may need to enlist the services of a professional. Some Spyware is so intelligent that it looks to see if AntiSpyware programs delete the Spyware part of its programming and, if it’s gone, reinserts it back in place. This can be very frustrating for the user (and in some cases, even for the professional). There are stronger measures that can be taken to get rid of the Spyware, in cases like this, but can be very devastating to the user’s computer, if not handled perfectly. At this point, leave it to the professional. Call a local computer repair company and have them come out to your home or business and get rid of the Spyware for you.
In some cases, when the Spyware has become too entwined into your system, even a computer repair technician can’t get rid of the Spyware. At this point, it is better to just backup only what you need and have the operating system reinstalled. Believe me, when your computer gets to this point, you don’t want to just put a “band-aid” on it. Just start from scratch with a clean system. It’s the best way to go.
9). Streamline MSCONFIG: One thing that really causes a HUGE performance decrease is to have unnecessary programs running in the background. Some of these programs can be seen in your System Tray (located next to the clock, in the lower-right corner of your screen). These are tiny programs that are robbing you of memory and processing power. Some of them you need, while most you don’t. Some of the programs you DON’T need are printer icons, CD burning icons, shortcuts to programs (such as video settings), AOL, any Instant Messaging Programs, etc. Just because these programs aren’t always running, doesn’t mean that you still can’t print, burn CDs or Instant Message. They can be run when you need them, from a shortcut.
You can use a utility, called MSCONFIG, to turn OFF unnecessary Start Up items.a. In Windows 98, Me, and XP, click on StartRun and type msconfig. Click on the Startup tab. This is a list of everything that is running in the background, some of which show up in the System Tray. Now, be careful, some of these you do need. Some items to keep are Ctfmon.exe (XP), Scan Registry (Win98, Me), Task Monitor (Win98, Me), System Tray (Win98, Me), LoadPowerProfile (Win98, Me), Rundll.32, any AntiVirus programs (such as McAfee, Norton, or AVG). Others, you can uncheck, such as NeroCheck, ypager, qttask, AOL, and any other Instant Messaging programs, or printing programs. Remember, if something doesn’t work, because you turned it off, it can always be turned back on. You just have to reboot every time you make a change here. But, as you uncheck the unnecessary programs that run in the background, you will see that Windows loads much faster, that there are less icons in the System Tray, and that your system is much more “snappy” and quick to respond.b. In Windows 2000, MSCONFIG wasn’t supplied. You actually have to download and run an MSCONFIG utility. A Google Search on "MSCONFIG utility" leads you to the download page, you can download this software from there. And if you copy it into your C:Windows(or Winnt)System32 folder, you can access it the same way as Windows 98 or XP (by the Run command in the Start menu). Or, you can just double-click it and use it that way, too. See above for what to leave checked and unchecked.
After you reboot, you will have a window that says that the configuration utility was edited. Just check not to show that in the future, a check box at the bottom. This just means that there was a change made to the MSCONFIG.
10). Defragment your hard drives: If you have never done this, or it has been a few months since the last time, this step is one of the most important things that will give you more performance. As you use your computer, your drives become fragmented, by creating and deleting files. Just because a file is 10mb in size, doesn’t mean that it is sitting there on the drive (all 10mb) all in one spot on the drive. It fills in from the inside of the drive, outward, as the drive finds room. So your one file can be in pieces, in several spots on the hard drive. Don’t worry, your file allocation table keeps track of where the pieces are, however, it takes longer to access a file that is in pieces (fragmented), than a file that IS all in one spot on the hard drive. This is where defragmenting comes in. When you defragment your hard drive, this process copies all of the pieces to temporary spots on the hard drive, and then fills in all of the files (in their entirety) from the inside, out, so that no files are split into pieces. This dramatically speeds up the seek time, as well as speeds up the use of your files and programs.NOTE: to efficiently defragment a hard drive, it likes to have 25% free space. It can still do the defragmentation with only 15% free space, but it takes quite a bit longer. If you can, delete any unnecessary files before deframenting your drives.a. To defragment your hard drives (in any Windows operating system), double-click on My Computer. Right-click on the c-drive and click on Properties. Click on the Tools tab and choose the bottom button, to Defragment Now… Click on the appropriate drive, and then on Defragment. This can take some time. Depending on your processing power, the amount of RAM you have available, the size and speed of your drive, and a few other things, this process can take 20 minutes, or hours. It is best to let this one run over night, as well, but it is well worth it.

Wednesday, October 29, 2014
Speed up a portion of a videoclip in Camtasia Studio
This tutorial is about Techsmith Camtasia Studio, probably the best software to edit tutorial videos now a days. It is very user friendly and easy to use software. Camtasia Studio 8.1.2 comes out with some great features, with the help of those we can actually create tutorial videos like the professionals.
In this discussion I shall be sharing the idea of clip speed, how can we speed up a particular portion of a video or how can we slow down a portion of a video. To follow this tutorial you need to pre install Camtasia Studio, it will be better if you install the version 8.1.2. Secondly you need a video to edit. So without pulling more this discussion, I am going to write the necessary steps with some screenshots, which will help you to understand better.
Follow the following steps
1) Run the Camtasia Studio, after installation.
2) Now click on Import media to insert the video
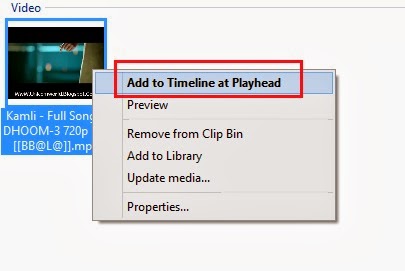
3) Now Right Click on the Video and click on Add to Timeline at Playhead
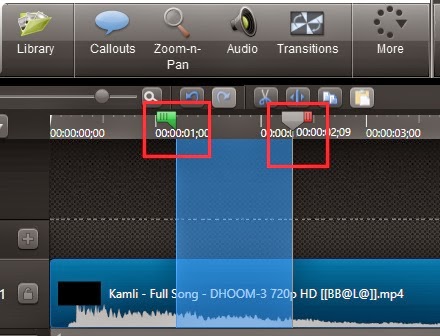
 4) Now select the portion of the video, which is to be speed up. (Take the help of the following screenshot)
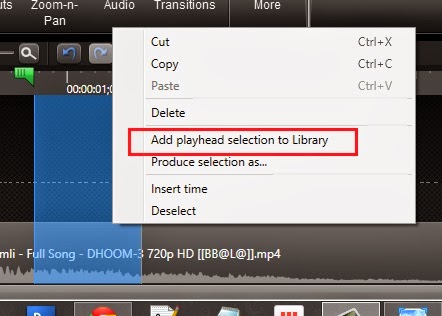
5) Now Right click on that portion and click on Add playhead section to Library as shown in the screenshot
 6) From the Library add the clip to the timeline, after adding the clip the timeline will be like
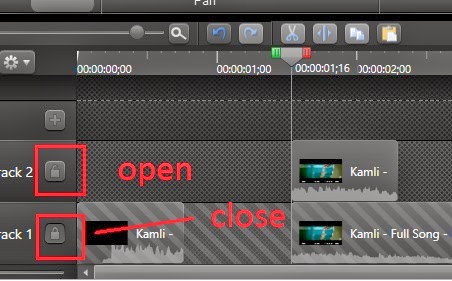
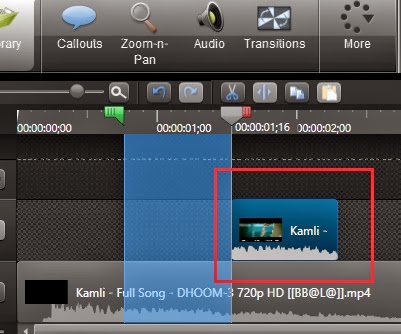 7) After that lock the recently added clip by clicking the open lock as shown in the following screenshot
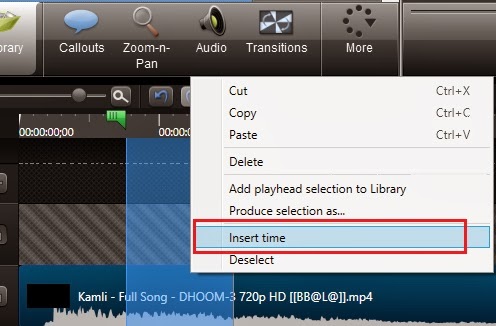
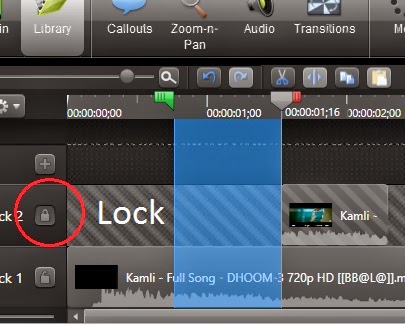 8) Now Right Click on the selected (blue coloured) video portion and click on Insert time, as shown in the screenshot
9) Now you will get a timeline as shown in the following screenshotIn this discussion I shall be sharing the idea of clip speed, how can we speed up a particular portion of a video or how can we slow down a portion of a video. To follow this tutorial you need to pre install Camtasia Studio, it will be better if you install the version 8.1.2. Secondly you need a video to edit. So without pulling more this discussion, I am going to write the necessary steps with some screenshots, which will help you to understand better.
Follow the following steps
1) Run the Camtasia Studio, after installation.
2) Now click on Import media to insert the video
3) Now Right Click on the Video and click on Add to Timeline at Playhead
5) Now Right click on that portion and click on Add playhead section to Library as shown in the screenshot
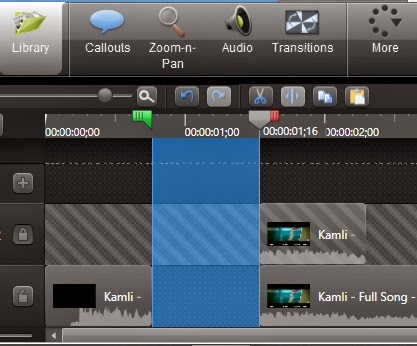
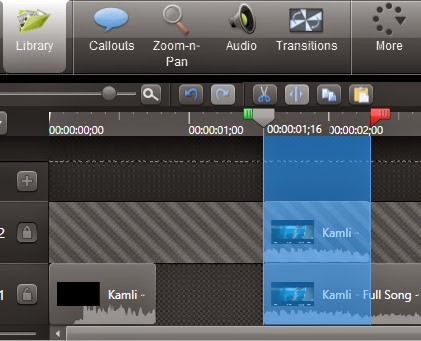
11) Now Right Click on that selected portion and click on Cut

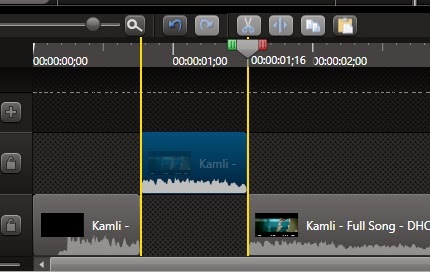
14) Now Right Click on the Clip and click on Clip speed, set the value, by default it is 100, if you want to speed up the clip increase the value and vice versa.
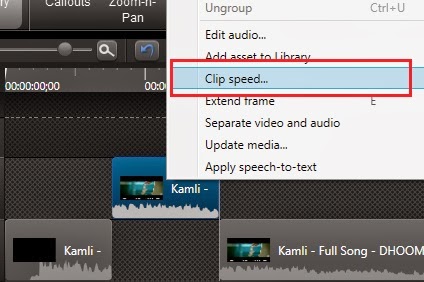
15) Finally select both the clips by pressing the Ctrl Key on the keyboard, and make them a Group. At last produce the video.
Carefully follow the above steps, if you get any problem, you can contact us. Thanks
Friday, October 10, 2014
How to Set up Speed Dialing on HTC One
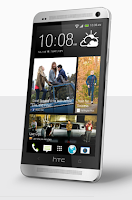
1. First, open the phone app on your device.
2. Then tap
 and go to Speed Dial.
3. Now tap
 and select a contact from the list.
4. On the Speed dial Lcd, choose the phone number of the contact to use
and a speed dial key to assign for that contact.
5. Once your done, tap Save.
Take note that the number 1 key is generally used and reserved for calling voicemail and retrieving voicemail messages.
Monday, September 29, 2014
How to Set up Speed Dialing on HTC Desire U
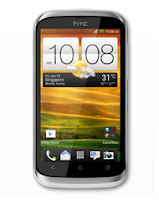
1. First, open the phone app on your device.
2. Then tap
and go to Speed Dial.3. Now tap
and select a contact from the list.4. On the Speed dial Lcd, choose the phone number of the contact to use
and a speed dial key to assign for that contact.
5. Once your done, tap Save.
Take note that the number 1 key is generally used and reserved for calling voicemail and retrieving voicemail messages.
Saturday, September 20, 2014
HTC Desire 200 Ultra Affordable Android Phone with 1GHz Speed
HTC Desire 200 is the latest affordable budget smartphone which was earlier spotted by the Taiwanese site. Though the exact list of specs and certification is still not know, we got to know some of the specs which we will be checking out in the due course of this article. The exact details about the availability of this device is still not known but we will keep you updated on the same.

HTC which recently said that it wants to substantially increase the market share by a considerable amount, by launching such smartphones constantly will ensure that the presence of the company is felt by consumers and users will consider HTC while buying the smartphones.
Specs and Features of HTC Desire 200:
To Start with, this device comes with 3.5inches of Screen Size and 1GHz of Single Core Processor. The only issue at present is that this seem to come with the Ice Cream Sandwich Android 4.0.4 OS and not with the latest Jellybean 4.1 / 4.2 Android OS. The best part is the pricing, this device will be placed in the low cost segment and in India there are not many devices which are priced in this segment. It will not only be a challenge for HTC but also will be a huge opportunity for HTC when it comes to sell this smartphone. We have summed up the list of features below;
3.5 inched WVGA Screen,
1GHz Single Core Processor,
ICS Android 4.0.4 OS,
5MP Camera,
512MB RAM,
4GB Internal Memory,
1400mAH Battery
1GHz Single Core Processor,
ICS Android 4.0.4 OS,
5MP Camera,
512MB RAM,
4GB Internal Memory,
1400mAH Battery
We will keep you posted about more details of this smartphone in coming days. Also, additionally we will also be updating this article with more specs and features.
Subscribe to:
Posts (Atom)